저작권 안내
- 책 또는 웹사이트의 내용을 복제하여 다른 곳에 게시하는 것을 금지합니다.
- 책 또는 웹사이트의 내용을 발췌, 요약하여 강의 자료, 발표 자료, 블로그 포스팅 등으로 만드는 것을 금지합니다.
글로벌 사진 사이트 구축하기
이재홍 http://www.pyrasis.com 2014.03.24 ~ 2014.06.30
Node.js로 웹 서버 작성하기
필요한 AWS 리소스를 생성하고 설정하였습니다. 이제 Node.js로 웹 서버를 작성해보겠습니다.
다음 예제 코드는 저의 GitHub 저장소에 있는 예제 코드를 받아서 사용합니다.
app.js
var express = require('express')
  , multer = require('multer')
  , AWS = require('aws-sdk')
  , Sequelize = require('sequelize')
  , mime = require('mime')
  , http = require('http')
  , fs = require('fs')
  , app = express()
  , server = http.createServer(app)
  , s3 = new AWS.S3({ region: 'ap-northeast-1' })
  , sqs = new AWS.SQS({ region: 'ap-northeast-1' });

var s3Bucket = 'examplephoto.image';
var sqsQueueUrl = 'https://sqs.ap-northeast-1.amazonaws.com/232075047203/ExamplePhotoQueue';
var rdsEndpoint = {
  host: 'examplephoto.cnlconsezo7y.ap-northeast-1.rds.amazonaws.com',
  port: 3306
};

// MySQL DB 이름, 계정, 암호
var sequelize = new Sequelize('examplephoto', 'admin', 'adminpassword', {
  host: rdsEndpoint.host,
  port: rdsEndpoint.port
});

// MySQL DB 테이블 정의
var Photo = sequelize.define('Photo', {
  filename: { type: Sequelize.STRING, allowNull: false, unique: true }
});

// MySQL DB 테이블 생성
sequelize.sync();

app.use(multer({ dest: './uploads/' }));

app.get(['/', '/index.html'], function (req, res) {
  fs.readFile('./index.html', function (err, data) {
    res.contentType('text/html');
    res.send(data);
  });
});

// 이미지 목록 출력
app.get('/images', function (req, res) {
  Photo.findAll().success(function (photoes) {
    var data = [];
    photoes.map(function (photo) { return photo.values; }).forEach(function (e) {
      data.push(e.filename);
    });

    res.header('Cache-Control', 'max-age=0, s-maxage=0, public');
    res.send(data);
  });
});

// 웹 브라우저에서 이미지 받기
app.post('/images', function (req, res) {
  fs.readFile(req.files.images.path, function (err, data) {
    var filename = req.files.images.name;
    s3.putObject({
      Bucket: s3Bucket,
      Key: 'original/' + filename,
      Body: data,
      ContentType: mime.lookup(filename)
    }, function (err, data) {
      if (err)
        console.log(err, err.stack);
      else {
        console.log(data);

        sqs.sendMessage({
          MessageBody: filename,
          QueueUrl: sqsQueueUrl
        }, function (err, data) {
          if (err)
            console.log(err, err.stack);
          else
            console.log(data);
        });
      }
    });
  });

  res.send();
});

server.listen(80);
다음은 app.js에서 사용한 모듈들의 버전을 정의한 파일입니다.
package.json
{
  "name": "ExamplePhotoWebServer",
  "version": "0.0.1",
  "description": "ExamplePhotoWebServer",
  "dependencies": {
    "express": "4.4.x",
    "multer": "0.1.x",
    "aws-sdk": "2.0.x",
    "mime": "1.2.x",
    "sequelize": "1.7.x",
    "mysql": "2.3.2"
  }
}
다음 내용을 index.html로 저장합니다.
index.html
<!DOCTYPE HTML>
<html>
<head>
  <title>ExamplePhoto</title>
  <link rel="stylesheet" href="//netdna.bootstrapcdn.com/bootstrap/3.1.1/css/bootstrap.min.css">
  <link rel="stylesheet" href="//cdnjs.cloudflare.com/ajax/libs/blueimp-file-upload/9.5.7/css/jquery.fileupload.min.css">

  <script src="//ajax.googleapis.com/ajax/libs/jquery/1.11.1/jquery.min.js"></script>
  <script src="//ajax.googleapis.com/ajax/libs/jqueryui/1.10.4/jquery-ui.min.js"></script>
  <script src="//cdnjs.cloudflare.com/ajax/libs/blueimp-file-upload/9.5.7/jquery.fileupload.min.js"></script>
</head>
<body>
  <span class="btn btn-success fileinput-button">
    <i class="glyphicon glyphicon-plus"></i>
      <span>Select files...</span>
      <input id="fileupload" type="file" name="images" multiple>
  </span>

  <div id="progress" class="progress">
    <div class="progress-bar progress-bar-success"></div>
  </div>

  <div id="imagelist"></div>

  <script>
    $(function () {
      $('#fileupload').fileupload({
        url: '/images',
        dataType: 'json',
        progressall: function (e, data) {
          var progress = parseInt(data.loaded / data.total * 100, 10);
          $('#progress .progress-bar').css('width', progress + '%');
        }
      });

      $.getJSON('/images', function (data) {
        $.each(data, function (i, e) {
          var img = $('<img>');
          // 도메인을 구입하였다면 image 서브 도메인 입력
          //img.attr('src', 'http://image.examplephoto.com/resized/' + e)
          // 도메인을 구입하지 않았다면 CloudFront 배포 도메인 입력
          img.attr('src', 'http://d3fo0v5xpnp6x5.cloudfront.net/resized/' + e)
          .attr({'width': '150px', 'height': '150px' })
          .addClass('img-thumbnail');
          $('#imagelist').append(img);
        });
      });
    });
  </script>
</body>
</html>
앞에서 생성한 <프로젝트 이름>.src S3 버킷에 ExamplePhotoWebServer라는 디렉터리를 생성하고 app.js, package.json, index.html 파일을 올립니다.
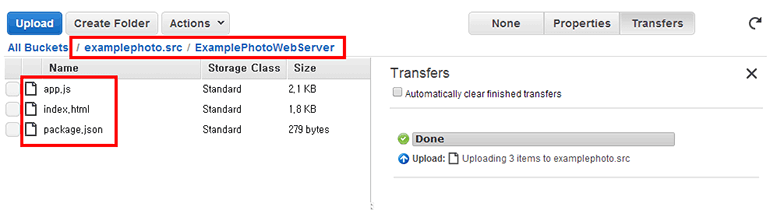 그림 31-16 S3 버킷에 웹 서버 Node.js 소스 올리기


저작권 안내
이 웹사이트에 게시된 모든 글의 무단 복제 및 도용을 금지합니다.- 블로그, 게시판 등에 퍼가는 것을 금지합니다.
- 비공개 포스트에 퍼가는 것을 금지합니다.
- 글 내용, 그림을 발췌 및 요약하는 것을 금지합니다.
- 링크 및 SNS 공유는 허용합니다.
Published
2014-09-30